Attendee Registration
An ability of your website's visitors to pay and register for the events without leaving your website is extremely important. The process of registration contains several steps and should be followed in order for Workshop Butler to handle everything correctly. This section describes the steps of the registration process in detail allowing you to implement them manually.
We recommend using JS widgets and WordPress plugins as they support the registration
process out-of-the-box and remove the need for you to write any code.
Registration Steps
There are four steps in the registration process. Some of them are optional, and you can skip them. However, some data won't be present in the attendee's profile.
- Rendering the registration form
- Validating VAT
- Accepting payment
- Validating the form data
Rendering Registration Form
Workshop Butler allows users to configure what information they want to collect during the registration. The users can add new fields of several types, make fields optional or required, and add fill-in instructions for the forms.
As a result, a set of attendee attributes, passed to the system through API for successful registration, can differ from event to event. You can hard-code a predefined set of fields on a registration form, but we discourage you from doing it as it limits the user's ability to tweak the system for their needs, and may lead to errors.
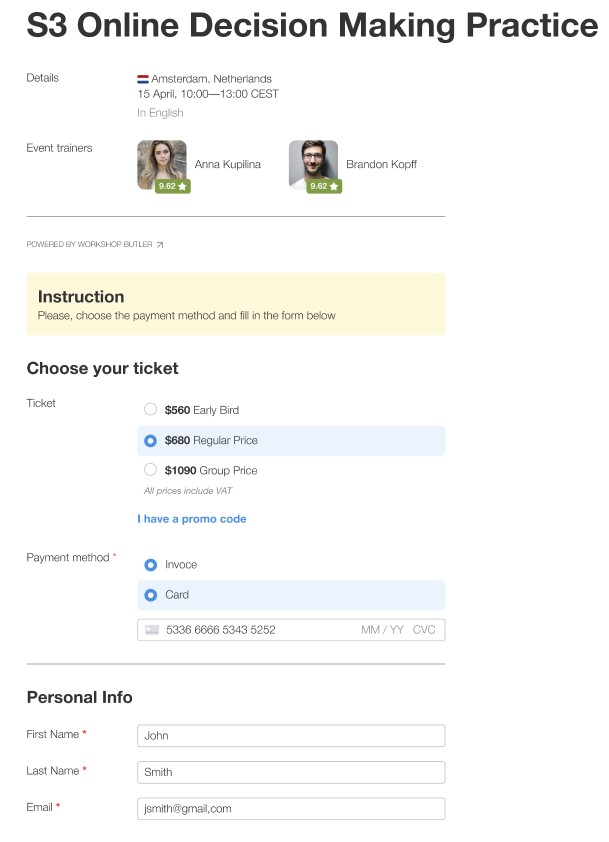
Below is an example of the registration form that users can see when they visit the registration page.
Structure
info
For a full reference of the structure of the registration form, see the form property
of Event object.
The form object consists of the following properties:
instructions: instructions for the user to fill in the form. It's a simple text without any formatting whatsoever.sections: each form is split tosectionsthat contains one or morefields.
The sections and fields are ordered according to the user's desire. The only exception is ticket section which always
goes first if it exists. We recommend rendering the instructions before the rest of the form.
For example, this is a simplified form structure:
[
  {
    "label": "Personal Info",
    "id": "personal",
    "fields": [
      ...
    ]
  },
  {
    "label": "Billing Address",
    "id": "billing",
    "fields": [
      ...
    ]
  }
]
Based on it, you can create a form like:
<form>
    <fieldset>
        <legend>Personal Info</legend>
        <p>
            <input ....>
        </p>
    </fieldset>
    <fieldset>
        <legend>Billing Address</legend>
        <p>
            <input ....>
        </p>
    </fieldset>
</form>
Sections and Fields
A section contains the set of fields, id and label. The label is in English. If your forms are in different
languages, use id to identify the section and label it accordingly. We use this approach in JS widgets
and WordPress plugins.
A field has four attributes: name, type, required, and label. select field contains one more attribute with
the list of options.
{
  "name": "first_name",
  "type": "text",
  "required": true,
  "label": "First Name"
}
From this JSON you may create a code similar to:
<label for="first_name" class="required">
    First Name
    <input type="text" name="first_name"/>
</label>
name is a unique field name which is passed to through API along with a field's value. Using the name, Workshop
Butler maps the passed parameters to relevant attendee's attributes.
caution
It is up to you to check if a visitor fills in the fields with required=true. The system returns an error if one or
several required fields are empty.
There are eight field types:
| Type | Description |
|---|---|
| text | Basic input field, <input type="text" ..> |
| checkbox | Checkbox with true/false value, <input type="checkbox" ...> |
| select | Select field, <select name=""><option>... </select> |
| date | Date in format YYYY-MM-DD, <input type="date" ...> |
| textarea | Large text input, <textarea ....> |
Email, <input type="email" ...> | |
| country | List of countries to select from. A passed value for this field should be an ISO 8166-2 country code (de, RU). |
| ticket | A reserved field type. See below how to handle it. |
The rendering of most sections fields is straightforward as the related API object contains all information needed for the rendering. There are a couple of noticeable exceptions that are explained below.
Ticket Section
The ticket section is one of two sections that requires your attention as its logic is more complicated. The section
does not exist if:
- the
eventis free - the
eventis paid but the user selectedWithout ticketsoption. It means that a visitor can register to the event without paying for it or selecting a ticket.
If the section exists, it can contain only two fields: ticket and promo_code. The ticket is required,
the promo_code is optional. Though the promo_code can be rendered as it is, a simple text field, the ticket
field is just a placeholder - it shows where the ticket selector should be placed.
The information about available ticket types is situated in event.tickets.paid.types array. Some ticket types may not
be available during the time of registration. It's up to you to filter inactive types out. The ticket type is active
when:
- Number of available tickets (the
leftproperty) is greater than zero - The sales of the ticket type has already started (the
startproperty is not in the future ornull) - The sales of the ticket type has not ended (the
endproperty is not in the past ornull)
You must pass the ticket type ID to the ticket field. Workshop Butler verifies the validity of the selected ticket
type.
info
The price of tickets in the event.tickets.paid.types[n].price property are in cents
Tax
Each ticket type comes with a calculated tax amount that may be charged on top of the ticket price. Whether to show it,
or not, depends on the event.tickets.paid.tax_excluded property.
- If
true, the tax amount is not included into the ticket price and must be shown in the ticket description. - If
false, the tax amount is included. It's up to you to show it or not.
danger
You must show the information about available tickets correctly. It's prohibited to alter a ticket price, currency and tax amount. It may lead to an immediate suspension of your API key and account.
Payment Section
This section includes the only field, payment_type of select type. It may have up to three values:
Card- credit card via StripePayPal- PayPalInvoice- invoice
Each value defines a different payment method that a user activated for the event. For more information, see Accepting payments.
Validating Tax Number
info
The validation of the tax number depends on the value of the event.tickets.paid.tax_validation property. If it's
true, you need to launch a tax validation process. If it's false, the tax number is not validated, and you can skip
this step.
During a registration process for an event, a visitor may decide to provide a tax number for various tax purposes (for example, to get a VAT exemption if the company is in EU). To make sure that a provided tax number is valid and tax exemption can be applied, the number must be verified.
You need to implement a tax validation process that consists on the following steps:
- The visitor enters a tax number in the registration form.
- The visitor starts a validation process. For example, by clicking "Validate" button. The
tax validationrequest is sent to the API. - Workshop Butler responds with a validation result, that includes the
tax_intent_idproperty and the validation status. The value of this property must be sent during the form submission. Otherwise, the tax exemption (if it exists) won't be applied, and the tax number won't be saved. - If the
tax_exemptproperty of the validation response istrue, then the tax must be excluded from the ticket price. - The visitor sees the result of the validation (read further for more details).
Validation Response
caution
Right now we only support the validation of the EU VAT numbers.
When a visitor enters a tax number that is not EU VAT number,
the validation doesn't fail completely. It responds with warn code that you need to handle.
The response contains message_type and message_text properties that help you to show the validation result to the visitor
without difficulties.
The message_type property defines the status of the validation. It can have the following values:
ok- the tax number is a valid EU VAT numberwarn- the tax number is not EU VAT, and we count it as valid. For example, if a visitor provides Canadian's GST. However, it could also be an error if a visitor enters a VAT number without two leading letters.error- the tax number is EU VAT, and it's either invalid or a VAT verification database is down
The message_text property contains the explanation of the validation status that you can show to the visitor. It's
translatable to several languages. See the tax validation endpoint for more details.
Accepting Payments
TBD
Sending Registration Request
TBD