
-
 Product
Save time and scale up efficiently with complex solution for training business
Product
Save time and scale up efficiently with complex solution for training business
-
 Event Management
Automate and streamline all processes
Event Management
Automate and streamline all processes
-
 Communication with Attendees
Send notifications and request feedback
Communication with Attendees
Send notifications and request feedback
-
 Data and Statistics
Gather accurate, large-scale, and comrehensive statistics
Data and Statistics
Gather accurate, large-scale, and comrehensive statistics
-
 Website Integration
Integrate the system into your website to get the seamless control over your product
Website Integration
Integrate the system into your website to get the seamless control over your product
-
 Automation with Zapier
Create complex automated zero-code conveyors with Zapier integrations
Automation with Zapier
Create complex automated zero-code conveyors with Zapier integrations
-
 Feedback and Testimonials
Collect event evaluations to improve future events
Feedback and Testimonials
Collect event evaluations to improve future events
-
 Certificates
Generate and send certificates instantly
Certificates
Generate and send certificates instantly
-
 Customers
Here's what our customers say about us
Customers
Here's what our customers say about us
-
 Podcast
A weekly dose of success stories
Podcast
A weekly dose of success stories
-
 How to price a workshop
A complete guide to workshop pricing
How to price a workshop
A complete guide to workshop pricing
-
 Workshop Certificates Guide
A complete guide on how to write, design, and send
Workshop Certificates Guide
A complete guide on how to write, design, and send
-
 Blog
Useful notes about training industry
Blog
Useful notes about training industry
-
 Product Updates
All our releases in one place
Product Updates
All our releases in one place
-
 Help Center
Tutorials, guides, and FAQs
Help Center
Tutorials, guides, and FAQs

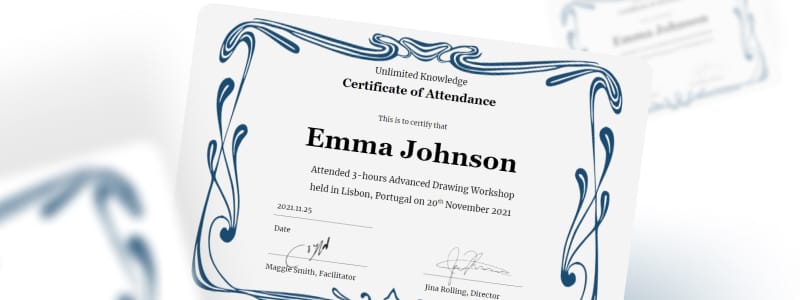
Certificates of participation are a logical conclusion for many training workshops. They are the evidence of attendance and a proof of learning efforts and achievements.
Although everyone has a rough idea what a certificate is, there are no regulations on the subject. Because of this, trainers who want to award their students with certificates can face certain challenges in the process of preparing and distributing them.
Finding the right answers to some of these challenges can increase certificates’ value and boost the reputation of the course. Solutions for others will help set up a smooth and quick procedure of certificate generation.
In this guide, we’ll take a look at the five most common problems related to making and sending certificates for training workshops:
- Who can issue a training certificate?
- On what conditions will students receive certificates?
- What to write on a certificate?
- How to make a certificate template?
- How to send certificates through email?
Who can issue a training certificate?
Certificates can be issued by anyone. You don’t need any accreditation to give it to others.
What you do need is a way to prove its value. And here it’s important to keep in mind one thing — a certificate is not a purpose for attending a workshop or a course. It is just a physical confirmation that a person took part in it. What really matters is the quality of the learning program a certificate is associated with.
On what conditions will students receive certificates?
The prospect of getting a certificate raises students’ motivation to sign up for your event. By adding various requirements to receive it, you can encourage attendees to participate more actively. It’s worth taking time to think about which conditions bring the most benefits to you.
Participating in an event. This is the easiest condition to fulfill, but perhaps, the least motivating and convincing one. Unless your workshops are well-known for their effectiveness and your name alone speaks for itself, simply stating that a person took part in some event won’t mean much. A person could attend, but doesn’t get anything out of it.
Passing a test. Certificates of participation are often not taken seriously because just taking part in an event doesn’t guarantee anything. Students could slack off during a training session knowing that they will get a certificate in any case. If, however, for getting it they have to show what they have learned, they will take it more seriously. It will also help you maintain a certain standard among those who have completed your courses. If you set this condition, you need to think through what to do with those who haven’t passed a test. Leaving them without certificates at all will result in negative reviews. Follow-up meetings where you can work out all unclear moments and conduct a test one more time could be a good compromise.
Participating and leaving feedback. The second requirement is beneficial for a trainer and their future events. While evaluations are a great tool for promotion, many students don’t want to spend their time on writing feedback. By providing a certificate after getting feedback you can be sure that you have enough testimonials to back up the quality of your courses.
Want to collect constructive feedback? Read our article on how to improve your post-event survey.
To give a better understanding of what your certificates are given for and how useful they are, you can add the detailed description of the training program and conditions for receiving a certificate to your website where anyone can find it.This measure will be especially useful for job searching: an HR manager can easily look up events certificates for which are attached to a LinkedIn profile.
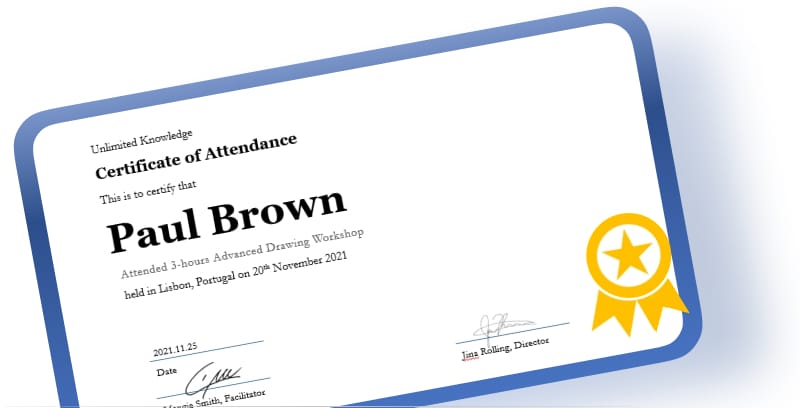
What to write on a certificate?
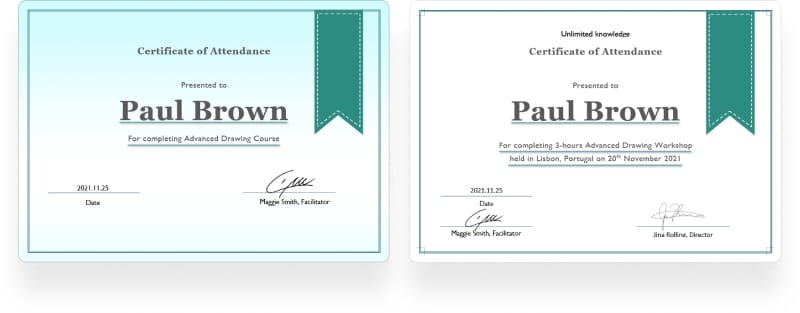
A certificate is only a single sheet of paper. And you need to cram in this space just enough information to make it clear what this document is about.
There are parameters that should be present on a certificate in any case and details that you can choose to omit depending on the situation.
A training certificate should include the following:
- Receiver’s name. A certificate confirms a certain person’s achievements and competency. Without a name, it will lose its credibility because anyone can pass it off as their own.
- Trainer’s name. Other people can look up the trainer profile and their courses to learn more about them. In addition, if a trainer has already built up a reputation, their name alone would add value to a certificate.
- Workshop title. Another detail for others to learn about a certificate’s origin.
- Results. A certificate should clearly state what it was given for: participation, successful completion, passing an exam.
- Date when a certificate was issued. When it comes to a fast-changing area of expertise, only recently acquired certificates really matter as only they prove that a receiver is up to date with the current trends. Another reason for new certificates holding more value than older ones is that they mean that knowledge is still fresh in the student’s head.
- Trainer’s signature. It’s a guarantee that the certificate is authentic.
- Certificate number. If it’s possible to confirm the authenticity of a certificate on a website, you should include a number by which anyone can do it. That would be the best proof that the certificate is valid.
What else could be added to a certificate:
- Detailed description of acquired skills. It will provide a clear understanding of what a certificate receiver has learned.
- Workshop location. Along with a workshop title, trainer’s name, and date, it makes the information on a certificate more precise and credible.
- Start and end dates. For many people, the length of the course correlates with its quality. If your classes take place over a significant span of time, you might want to show it on a certificate.
See our recommendations on the event duration.
- Duration/PDU. This parameter gives a more accurate idea of duration than the previous one. Let’s say, you conduct a 3-day workshop with each session lasting for 8 hours. In total, it would be 24 hours of training, which is quite an impressive number so why not emphasize it?
For getting some certifications (e.g. PMI), applicants need to study a certain number of hours. By including this parameter into your certificates, you will attract this group of people to your events.
More about PDU and how this feature works in Workshop Butler is here.
- Organization’s name. If you are representing a training company, you can add their name or logo.
- Director’s or manager’s name and signature. In case a certificate is issued by a company, this data can be used as an additional guarantee of authenticity.
When deciding what details to add to your certificate, think about why they need to be there. Students want to see the information that helps them prove their skills while trainers and facilitators need the details that will clearly point at them.
How to make a certificate template?
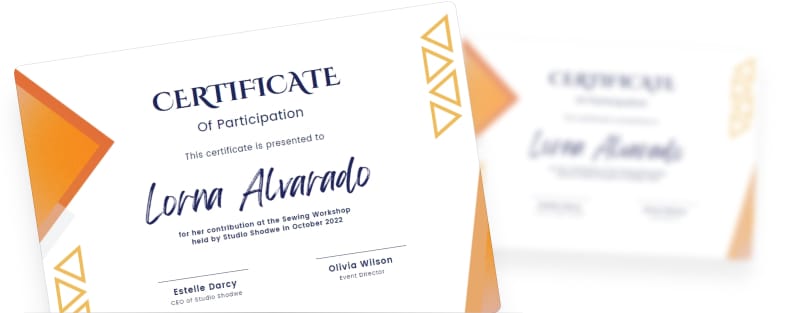
You can see certificate designs for all purposes and tastes on the net. What things to pay attention to when choosing a template or designing your own?
- The nature of your courses. A minimalistic design would work better with certificates for professional development which people will use for career advancement. No need to stick to strict styles, but at least you need to make sure it gives the right impression. If it’s for an arts or entertainment event, choose a colorful design reflecting the mood of the program.
- Information should be clearly presented. As we mentioned above, the most important parameters need to stand out the most.
- Font of your certificate should be easily readable. It shouldn’t make people squint their eyes trying to understand what’s written in there.
To create your own certificate template, you don’t have to master complex designer software. There are plenty of simpler options.
The easiest one is to download a template from the net. Although, there is a high chance that others have already used it. That’s why we recommend investing time in creating a certificate design just for your classes.
How to make a certificate online?
There are special services that allow you to create certificates online. Some of them make it possible to distribute certificates too.
Canva
It’s a multi-purposed design platform which suits for creating certificates. A free plan has a decent number of options and the Pro version opens access to a wide range of templates and images.
What you can do there:
- Choose a template. If you specifically type in “Workshop certificate”, the platform will show you the results that match your request.
- Create your own design, although the number of available elements is limited on the Free plan.
- Download it as .pdf, .jpg, .png. If you are using a ready-made template and there are images in there, the system will ask you to pay for downloading it, even on the Free plan.
Certifier
This service allows you to create templates, customize, and bulk send them.
On the Free plan, you can:
- Choose from several free templates or download your own image for the background.
- Edit font, size, color, and alignment.
- Populate certificates with information about students.
- Send up to 50 certificates every month
Paid plans raise the sending limit and offer additional features.

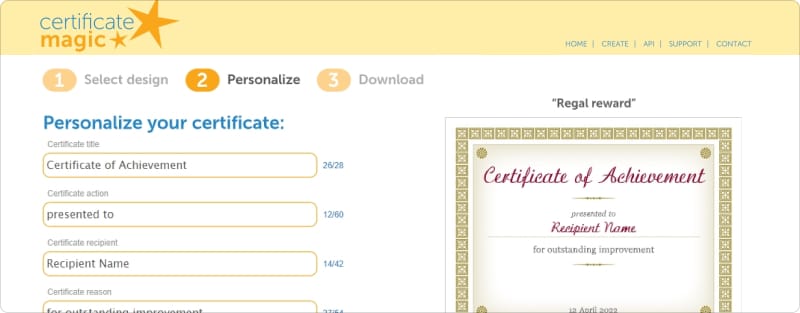
Certificate Magic
An extremely simple and completely free online service that doesn’t require even registration. The downside is that the choice of templates is limited too and you’ll have to make a copy for each participant separately, by manually adding their personal details. If you are looking for a fast solution and don’t care about originality much, this could be a good choice.
This list is far from being complete and there are many other apps for making certificates but their functionality is pretty much similar to each other.
Special software is not the only way to design a template. You can also use tools which can be found on almost every laptop.
How to make a certificate in Microsoft Word?
Template gallery: available.
Design elements: borders, shapes, images, icons.
Formats to save: doc, pdf, and others.
Bulk sending: works with Autocrat, Microsoft Mail Merge, Workshop Butler.
In Microsoft Word, you can choose from pre-made templates or design everything from scratch.
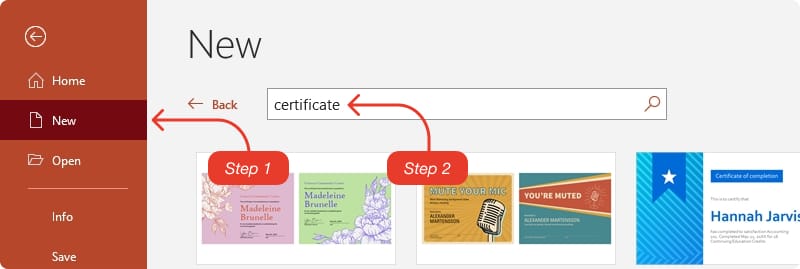
Choosing and editing a pre-made certificate template in Microsoft Word:
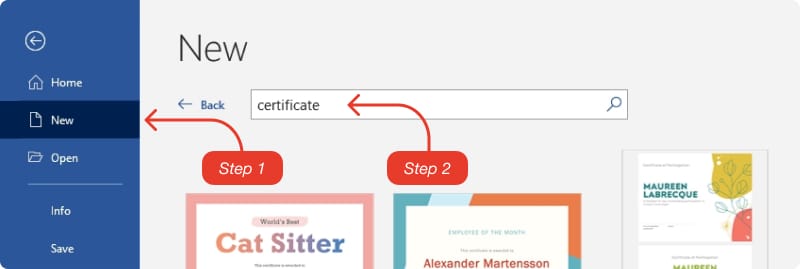
- Open the app and click File in the upper right corner.
- Click New in the left-side menu.
- In the Search bar, enter the word Certificate. You’ll see the list of available free templates.
- Choose the one that has caught your eye and click Create.
- Now you can redesign the certificate however you need.
The drawback of pre-made templates in Microsoft Word is that changing the design too much might be difficult. If you don’t find anything suitable in the template gallery, you can create your own ideal template.
Making a certificate template from scratch in Microsoft Word:
- Click File in the upper right corner.
- Click New in the left-side menu.
- Choose Blank Document.
- By default, the orientation will be vertical. If you want it horizontal, go to Layout → Orientation → change it to Landscape.
From here, you can start designing your certificate. There are lots of features and paths for this in Microsoft Word, so we’ll just list the ones that are most useful for this purpose:
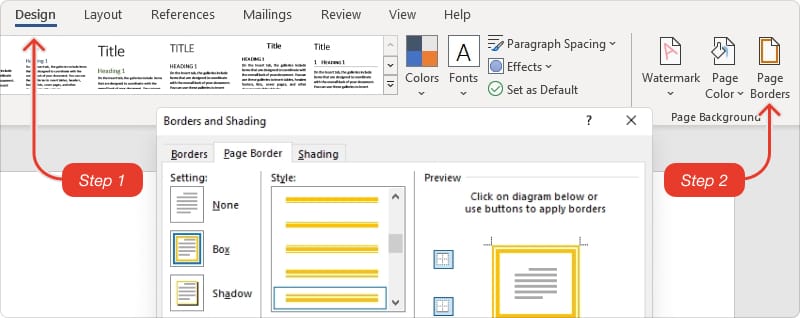
Design → Page Borders will create a frame for your certificate. You can choose among different patterns, change width and color.
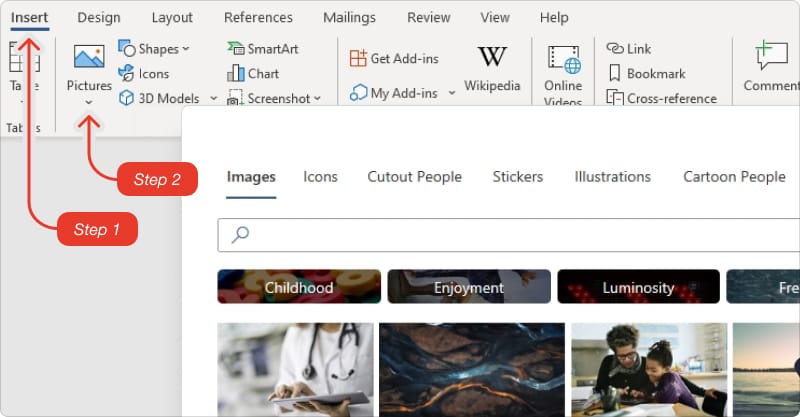
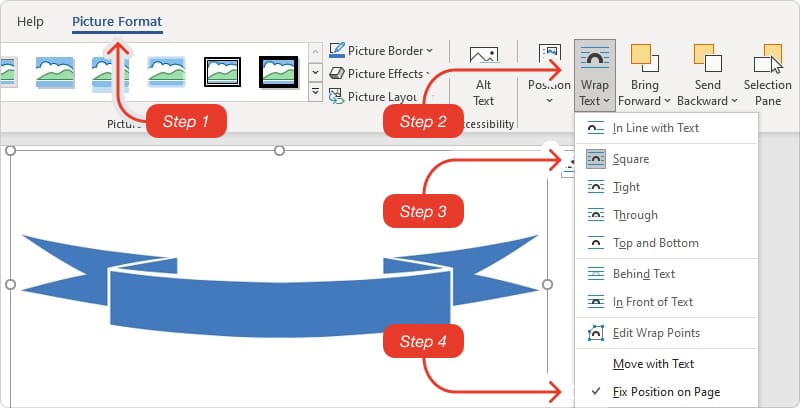
To create custom borders, use Insert → Pictures and add an image of borders. You can find one among stock images. To put it into the background, right click on an image → Wrap Text → choose Behind Text.
Design → Page Color will change the background color.
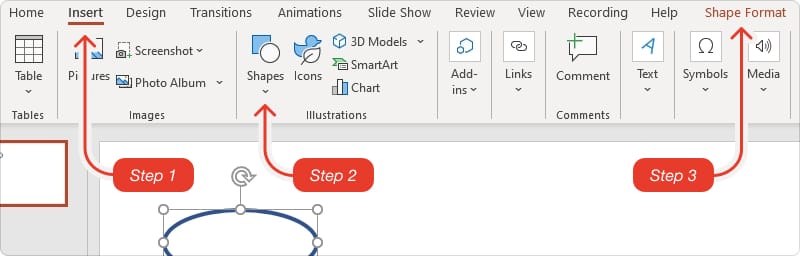
Insert → Shapes is another tool you can use to decorate your certificate.
Insert → Icons contain interesting ideas too. We recommend checking the Illustrations tab in the Images menu as you can find suitable pictures there.

Insert → Text Boxes place text on a template. You can change font, size, and color. If you plan to replace text in boxes with variables (e.g. names), remember to make them long enough so that any text can fit in there.
The Wrap Text option which appears upon the right mouse click on an object will put it behind or in front of other objects. E.g. you can use it to put an image in the background so that it doesn’t overlap with the text.
Useful tips:
- Margins: you can change how far borders or text are from the edges of the sheet. To change margins for borders, go to Design → Page Borders → click Options. To change margins for text boxes and other objects (images, icons, etc.), go to Layout → Margins.
- Removing borders around text boxes: text boxes you add might contain borders which you don’t need. To get rid of them, click on the text box → choose Format Shape tab that will appear at the top → find Shape Outline → choose No Outline.
- Aligning different objects: hold down shift and left-click on the objects you want to align. In the Shape Format tab, find Align and choose the option you need.
- Moving objects with keyboard: slightly moving an object with a mouse or touchpad could be difficult. Instead, left-click on an object and use your keyboard: hold down Ctrl and press arrows to choose direction.
- Moving objects on the page: sometimes, an object refuses to move or displaces other objects ruining the whole picture. To freely move an object on the page, select it , then go to Shape/Picture/Graphics Format → Wrap Text: switch from In Line With Text option to anything else, then choose Fix Position on Page.
Available formats. You can save a template in different formats: .doc, .pdf, .rtf, etc.
Sending options. Templates made in Microsoft Word work with services for bulk sending certificates: you can distribute certificates right from Word using Mail Merge or upload a template to Workshop Butler.
How to make a certificate in PowerPoint?
Template gallery: available.
Design elements: borders, shapes, images, icons.
Formats to save: jpeg, png, pdf, and others.
Bulk sending: work with Autocrat and Certify’em.
The process of making certificates in PowerPoint is similar to the one in Microsoft Word, but more convenient. It’s easier to access many tools, position objects, or align them.
Using pre-made certificate templates in PowerPoint:
The algorithm for searching and editing ready-made templates is the same as for Word, except that the templates themselves are different. It’s also easier to change the position of objects here than in Word where it might be faster to create a new object than trying to change the existing one.
We would recommend paying attention to the slide size: Design → Slide Size → Custom Slide Size → choose A4 in the dropdown menu. This way, certificates would be suitable for printing.
Making a certificate template from scratch in PowerPoint:
- Click File in the upper right corner
- Click New in the left-side menu
- Choose Blank Presentation
- Change Slide Size: Design → Slide Size → Custom Slide Size → choose A4 in the dropdown menu.
The set of available tools is a little bit different too so you have to do some operations in a different way:
Use Insert → Shapes or Pictures instead of Borders feature in Word. Shapes: choose the shape you want to use for a border and add it to your template → in the Settings for this object, choose Shape Fill → No Fill → adjust line’s width, form, and color in the Format Shape menu on the right.
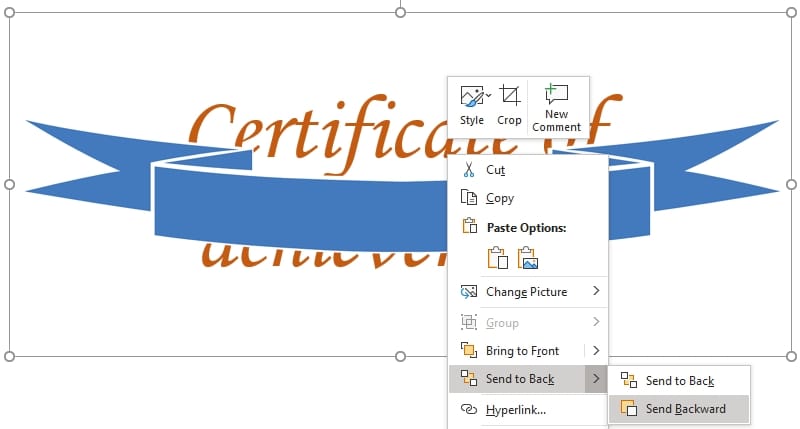
Pictures: add a picture from your computer or from the net. If you insert an image after adding other objects and it overlaps them, right click on the inserted image and choose the Bring to Back option.
Use Design → Format Background to change the background color.
As mentioned above, use Bring to Back and Bring to Front options which appear by the right-click on the object, instead of Wrap Text.
Available formats. You can save a template in different formats: .jpeg, .png, .pdf, etc.
Sending options. Certificates created in Powerpoint can be converted into Google Slides and bulk sent with Autocrat or Certify’em.
How to make a certificate in Google Docs?
Template gallery: no templates for certificates.
Design elements: borders, shapes, images.
Formats to save: .pdf and others.
Bulk sending: work with Microsoft Mail Merge and Workshop Butler.

Google Workspace has a free version and is affordable to everyone. For certificate templates, you can use either Google Docs or Google Slides. The latter is easier to use for template design, however, Google Docs allows you to create simple templates too.
Let’s see how to make a certificate template in Google Docs:
- Create a new document.
- If you need a horizontal format, change page orientation: Format → Page Orientation → Landscape.
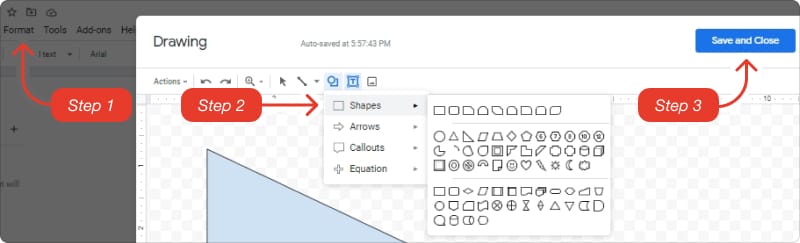
- Optionally, you can change margins to place borders or text closer to edges: go to File → Page Setup.For borders and text, go to Insert → Drawing option. Use Shapes to create borders and Text Boxes to add text.
- For borders and text, go to Insert → Drawing option. Use Shapes to create borders and Text Boxes to add text.
- Note that Google Docs treats each drawing as one object. If you want to move each text box and shape separately, you need to add each of them as a new drawing.
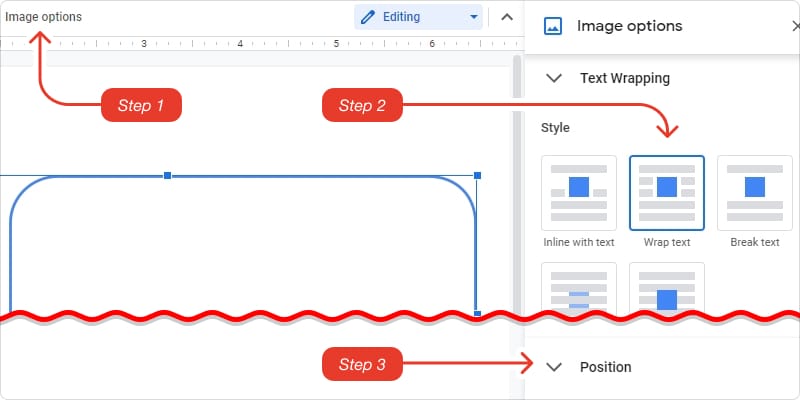
- You might also find it hard to move drawings or images on a page. To move them freely, click on an object after you have added it → choose Image Options at the top → change Text Wrapping to Wrap Text and Position to Fix Position on Page. You have to do it with every new object you add.
It’s possible to add images as well. If you plan to use them as a background, we recommend adding them in the end, when all other objects are in place. Insert an image and perform the same process as described above: in Image Options, change Text Wrapping to Wrap Text and Position to Fix Position on Page. Don’t worry, if other objects will be moved at this point → Resize and move an image how you need it, then change Text Wrapping to Behind Text. After that, all objects will return to their original position.
Available formats. You can download the file as .pdf or in other formats.
Saving options. Certificate templates created in Google Docs can be saved in .docx format and used with Microsoft Mail Merge and Workshop Butler.
How to make a certificate in Google Slides?
Template gallery: 2 certificate templates.
Design elements: borders, shapes, lines, images.
Formats to save: pdf, jpeg, png, etc.
Bulk sending: work with Autocrat and Certify’em.

Google Docs is not really a service meant for designing certificates. You can make a simple template with it, but nothing fancy. To have more options at hand and to create a good-looking certificate, we recommend trying another Google app — Google Slides.
In the gallery, there are a couple of templates for certificates, which you can edit. And to create a template from scratch, just choose the Blank option.
To make a certificate suitable for printing; change the page orientation: File → Page Setup → Custom → 29.7cm (11.7 inches) x 21 cm (8.3 inches) for horizontal orientation and vice versa for the vertical one. That’s the size of A4 paper.
The tools for designing a certificate in Slides are similar to the ones in Powerpoint:
- Create simple borders with Insert → Shape and change width and color.
- Add images, using Insert → Image. To put it into the background, right-click on the object → Order → Send to Back.
If you cannot move an image, try changing its settings: click on the image to select it → choose Image Options at the top → change Text Wrapping to Wrap Text and Position to Fix Position on Page. - Add Shapes and Lines from the Insert tab.
- Add text and position it on the page with Insert → Text Box.
- Click the Background button at the top to change the color of the background. You can also choose Background → Choose Image option. This way, it will be sent to back by default.
Available formats. The template can be downloaded as .pdf, .jpeg, .png, etc.
Sending options. Like Powerpoint templates, Google Slides will work with Autocrat and Certify’em.
How to send certificates through email?
Filling in each certificate manually, then sending it to each student is time-consuming and error-prone. And it’s also unnecessary as there are various tools populating certificates with data automatically and sending them to students via email.
How to send certificates via Google Sheets - Autocrat?
Template formats: Google Slides.
Personalization: Google Sheet.
Variables for personalization: attributes.
Sending conditions: upon submitting feedback in Google Forms or on time.
Autocrat extension uses the data from a Google Sheet to customize certificates and send them.

To send certificates automatically via email using Autocrat, you need to do the following:
- Install Autocrat extension for Google Sheets: Extensions → Add-ons → Get Add-ons → Search for Autocrat → click Install.
- Open the Extensions tab one more time and run Autocrat.
- Create a new job and give it a name to understand what it’s for (e.g., you can call it “Certificates of attendance for 2-days Drawing course”. This way, you won’t mix it up with other courses).
- Autocrat will ask you to download a certificate template from your Google Drive. You will need Google Slides format.
PowerPoint templates will work too because they can be converted to Google Slides:
- Open Google Drive and click the New button on the left.
- Choose File Upload and upload a file.
- You will see the uploaded file in the pop-up menu in the bottom right corner. Click on it to open.
- Click File → Save as Google Slides.
- Your template is ready to be uploaded to Autocrat.
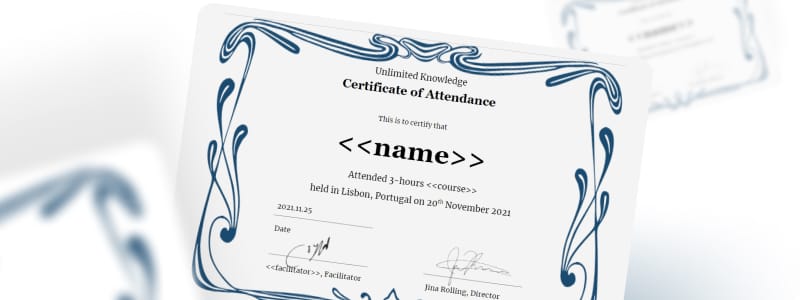
- Before you upload your template to Autocrat, there is one more step you need to perform in order for the extension to be able to populate fields. You need to add attributes — the variables Autocrat will replace with personal students’ data from a Google Sheet. All attributes are placed between these symbols: attribute. Let’s suppose that you want to add a student’s name and the name of the course they attended. Then you should add the corresponding attributes on the positions on your template where you want this data to be displayed: name and course. After that, proceed with adding a template to Autocrat.
- The extension will identify attributes you added and will ask you to match them with the columns in Google Sheet from where it will fetch the data. Choose the sheet in the Merge Tab, then choose “Maps to Columns” fields for each attribute.

- Choose how Autocrat should name each file. You can use attributes for this as well. For example, you want to add a student’s name to each file name to better distinguish between them. Click on the blue line with an arrow on the left. You will see that names of all columns were converted to attributes. Click on the one you need (e.g. Name). It will be copied to the clipboard. Return to the Extension menu and start typing in the File Name field. E.g., you can type: “Certificate of attendance for”, then paste an attribute copied earlier.
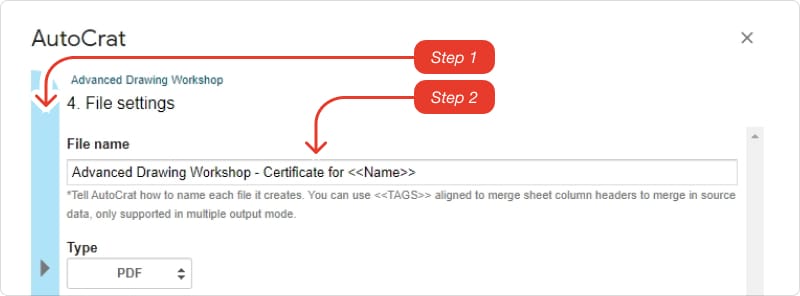
- On the same page, choose the file type for certificates: Google Docs or .pdf.
- Choose Multiple Output Mode. This way, each certificate will be generated as a separate file and not as one long document.
- Choose the destination folder on Google Drive where all generated certificates will be stored.
- The next step is Dynamic Folder Reference, which can sort certificates into different folders based on the data in columns. This feature is optional and can be skipped if necessary.
- You can also set different merge conditions where certificates will be generated only to those attendees who have specific data in a specific column. E.g. you want to generate certificates only for those who passed an exam and who have corresponding data about it in the Google Sheet (let’s say, you have a column “Passed an exam” and the data in it either Yes or No). In this case, you can choose a merge condition the following way: column “Passed an exam” equals “Yes”. If you don’t want to add any conditions, just click Next.

- You can either set Autocrat to send certificates in emails or save them on your Google Drive and send them later. If you don’t want Autocrat to send anything, check the No option. And if you want to configure the sending process, choose Yes. Here you can create a personalized message which will be sent to participants along with a certificate, as well as choose a file type (Google Doc or .pdf). Attributes here are helpful again and you can copy them the same way by clicking on the blue line. If you have email addresses as one of the columns in a Google Sheet, you can copy the attribute to the corresponding column, then paste it in the “To” field. You can also copy attributes for attendees’ names and course names and put them in a subject or a body of the message to make them personalized.

- The last step is triggers. This is where you configure when certificates are sent.
If you collect feedback first, then issue certificates, you can utilize the combination of Google Forms → Google Sheet → Autocrat: create a feedback form in Google Forms and send it to your students → before they start submitting responses, switch to the Responses tab of Google Forms and click on the Google Sheets sign to create a Google Sheet for responses → create a new job in Autocrat and set the Run On Form trigger to Yes. Now, every student who has submitted an evaluation for your course, will automatically receive a certificate. Just make sure to include in your questionnaire the fields necessary for populating a certificate (e.g. First name and Last name) and make them Required.
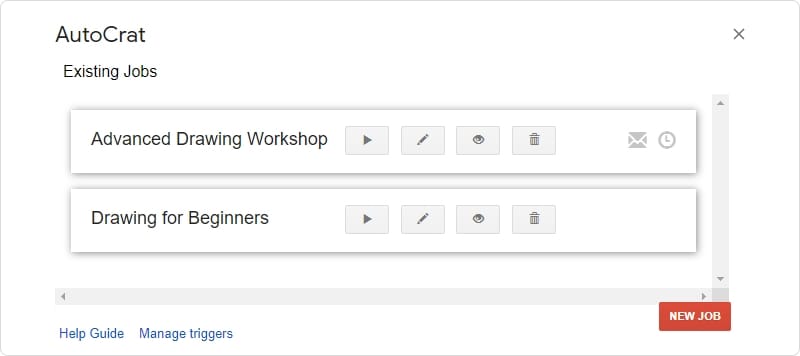
Another way is to enable the Run On Time trigger making an Autocrat generate certificates for new entries in set intervals. - That’s it, you can save the job and run it by clicking on the corresponding button in the list of Existing Jobs.
If you are using Google apps for your workshops, Autocrat could be a good solution. However, with other services to collect feedback, you will have to export data to Google Sheets first which means an extra step in the feedback gathering process.
How to send certificates via Google Forms - Certify’em?
Template formats: Google Slides.
Personalization: Google Form.
Variables for personalization: {{merge tags}}.
Sending conditions: upon submitting feedback in Google Forms.
Certify’em is another add-on working with Google apps. Unlike Autocrat, it works with Google Forms directly and generates certificates after a form is submitted. It’s primarily meant for issuing certificates for tests and quizzes; however you can use it for other purposes too.
To automatically send certificates from Google Forms using Certify’em, follow these steps:
- Certify’em was designed for quizzes so you need to turn your form into a quiz first: open Settings tab at the top of the form → enable Make This a Quiz.
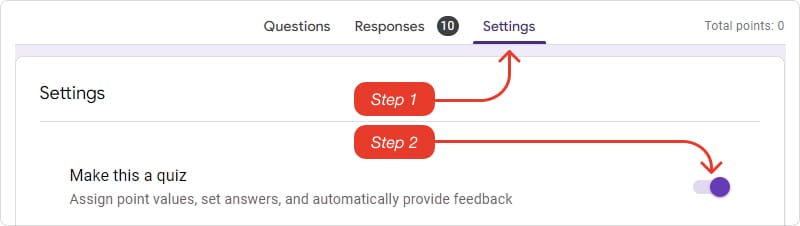
- Upon clicking on each question, you will see that they now have a counter for points assigned to them. Make sure that each question is assigned with 0 points
- Install Certify’em extension for Google Forms: Three dots in the top right corner → Add-ons → Search for Certify’em → click Install and close the Add-ons menu.
- Click on the puzzle piece at the top → Certify’em → Show Certify’em Contorls.
- In the menu at the bottom right corner, set Passing score to 0%. Without this, you won’t be able to enable certification.
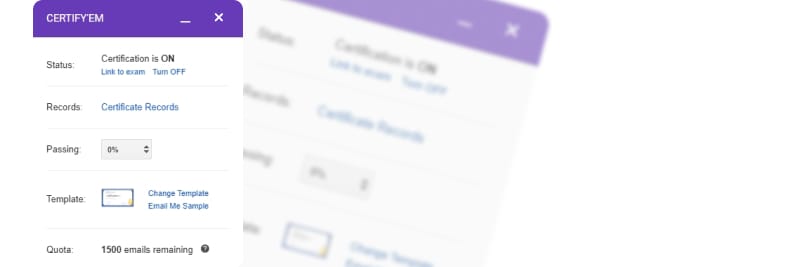
- Turn certification on using the first option in the menu.
- Choose a template. Certify’em offers you a set of premade templates and allows you to upload your own. Note that this add-on supports only Google Slides (or PowerPoint converted into Google Slides).
- Certify’em uses merge tags to populate certificates. Tag names and their order matter. Here you can find the list of available tags and the order they should follow one another: https://www.certifyem.com/custom-templates
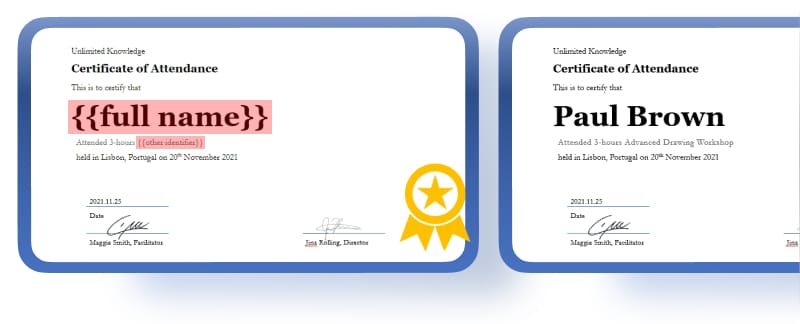
For example, you want to populate your certificate with a student’s full name and name of the course they attended. According to the list of tags, the data for the {{full name}} tag is fetched from the first question after email collection in your form. It means that the question about full name should always follow the question about email at the beginning of the form. If you also want to fetch the data about the course, you can use the tag {{other identifier}} which fetches data from the question following the {{full name}} question. Thus, all fields necessary for populating certificates should be at the beginning of the form in exactly particular order.
- Make sure that you’ve put the questions in the right sequence, add the corresponding merge tags to your template, and upload it to Certify’em.
- You can also click on the Advanced link to configure the email settings: subject, message body, format, etc.
- After that, all that’s left is to wait when your students fill in the evaluation form. If you want to test it, try filling in the form by yourself.
Certify’em is configured quicker and easier than Autocrat, however it has several downsides. First, since you are sending your Google Form as a quiz, your attendees will see a message about quiz results after completing the form, which might confuse them. And second, Certify’em has paid plans and on the free plan, there will be an app logo on all certificates it generates.
How to send certificates via Microsoft Word - Mail Merge?
Template formats: Microsoft Word.
Personalization: Microsoft Excel.
Variables for personalization: Merge_field.
Sending conditions: upon activation.
Microsoft Word has its own method of bulk sending certificates. It’s called Mail Merge.
To send certificates using Mail Merge, follow the steps below:
- Open your certificate template in Word.
- Click Mailings tab → Start Mail Merge → Letters.
- Click Select Recipients in the same tab → Use an Existing List.
- You will need an Excel document containing data for populating certificates. The first row should contain titles which Word will use for populating (e.g. “First name”, “Last name”, “Course”, etc.).
- Choose a file and open it. Leave the option “First row of data contains column headers” enabled.
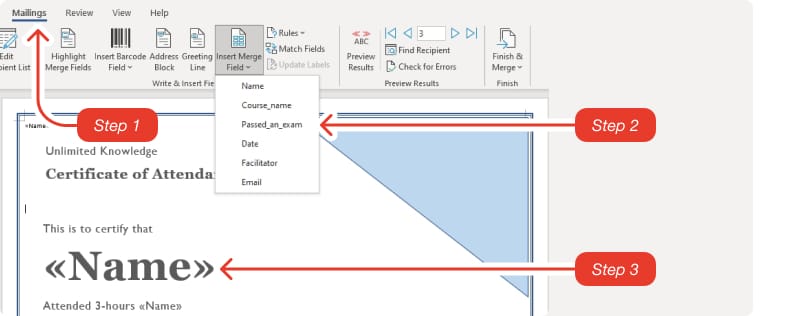
- Click on the position in the certificate which you want to be populated with data and click Insert Merge Field. You can choose from column headers from the Excel document to let Word know which data to fetch. E.g, you can choose “Name” from the list and add it to the corresponding position on the certificate
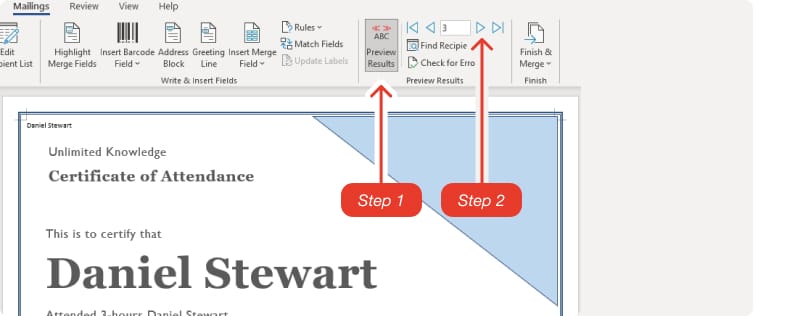
- Click Preview Results to see if you configured everything correctly. You can switch through all certificates.
- If everything’s fine, click Finish & Merge and choose how you want to see your certificates. You can either print them or send them right away. For the latter option, you will need one more field in your Excel sheet — Email Address. Choose this field for the To option when sending certificates.
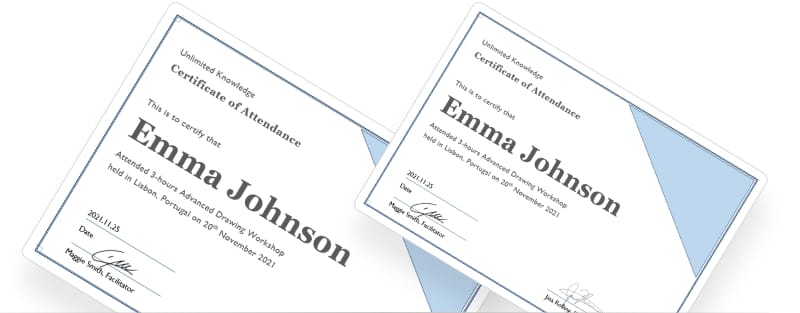
How to send certificates via Workshop Butler?
Template formats: Microsoft Word.
Personalization: made automatically by WSB
Variables for personalization: tags.
Sending conditions: automatically after receiving feedback or manually.
The sign of good software is that you don’t have to perform too many actions to accomplish a task. And Workshop Butler perfectly fits this description. The steps for sending certificates with it are the following:
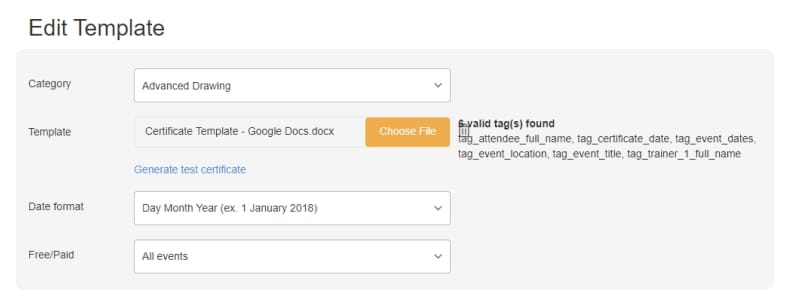
- Design a certificate template in .docx format using special tags listed here: https://support.workshopbutler.com/article/126-how-to-create-a-certificate-template
- Download a template to your Workshop Butler account. The system will show you which tags it recognized and allow you to generate a test certificate.
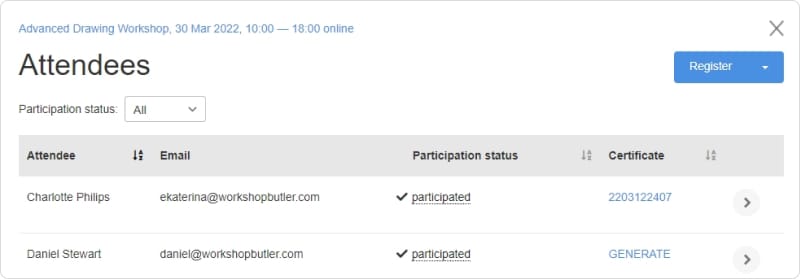
That’s it. These are all the steps you need to do in order for the certificates to be sent to your students. The rest will be done by the system. And here is how it will work:
- Workshop Butler handles the whole event management process from registration to issuing a certificate. When a student registers to a course, the information they provide during registration is added to the system.
- After an event ends, WSB asks attendees to submit feedback using a customizable evaluation form.
- Once an evaluation is submitted, the system generates a certificate using the information received during registration and information you added when creating an event in the system, to populate a certificate.

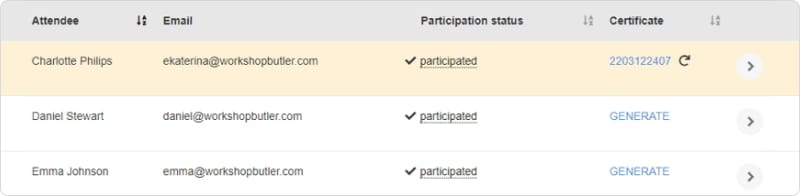
That’s the default way, but not the only one. Another method is to turn off automatic evaluation requests and generate certificates with a single click of a button for each attendee, then request evaluations.
What you can also do with WSB:
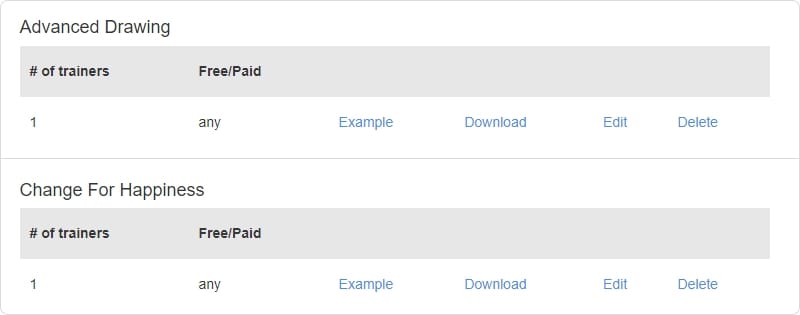
- Add different templates for different types of events. WSB will choose the appropriate template for each case.
- Download a trainer’s signature, which will be adjusted to a template.

- Easily regenerate a certificate if needed.
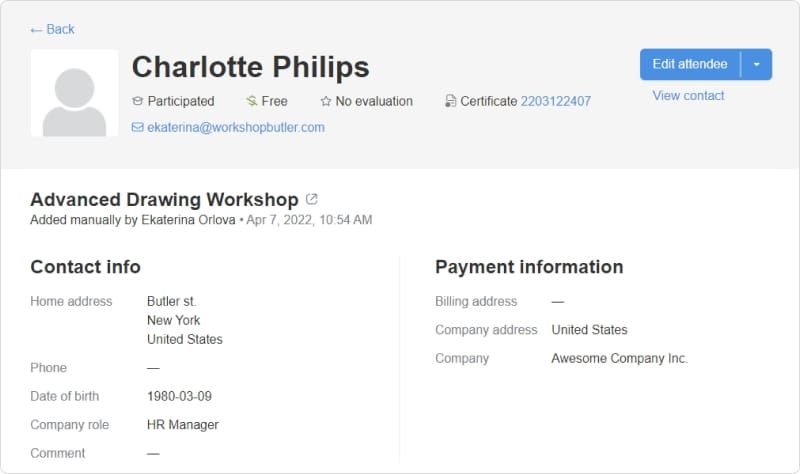
- Find the information about each certificate in the attendee profile which is created when a person signs up to an event.
Find more information about WSB certificates here.
Conclusion
Although workshop certificates are not obligatory, they give a lasting sense of accomplishment to students and serve as an additional reason for people to take part in an event.
Thinking through the process of certificate generation at the start and answering all possible questions will make these functions really work, becoming a benefit to your workshop or course.
Q: Who can issue a training certificate?
A: Anyone, no permission is needed.
Q: On what conditions will students receive certificates?
A: Certificates can be given for participation in a workshop or passing a test. Trainers can also send additional rules like submitting an event feedback first.
Q: What to write on a certificate?
A: A certificate should contain information that helps students prove that it belongs to them (e.g. name) and explain what it is given for (e.g. event title, trainer’s name). It can also include any other data that would be beneficial for students (e.g. event duration).
Q: How to make a certificate template?
A: Download a template from the net, use online services (e.g. Canva, Certifier, Certificate Magic, etc.) or standard tools (Microsoft Word, Microsoft PowerPoint, Google Docs, Google Slides).
Q: How to send certificates through email?
A: There are different apps for this purpose and the choice depends on the format of a certificate template and, sometimes, on how feedback is collected. Certificates can be sent via Autocrat, Certify’em, Microsoft Mail Merge. Or trainers can entrust the whole process to Workshop Butler.